Welcome to QUsb2Snes documentation.
QUsb2Snes is a reimplementation of the Usb2Snes websocket server using a more multi plateform framework (Qt, ench the Q in the name) than the original one.
You should look at http://usb2snes.com/ or jump to the Installation part if you are regular user.
Contents
Origin
Usb2Snes firmware
To make more thing more clear of what is exactly QUsb2Snes, let’s get back to the origin of the Usb2Snes project.
Usb2Snes is a firmware for the Sd2snes cartridge written by Redguyy that allows to use the USB port on the Sd2Snes to access various fonctionnality of the Sd2Snes. Most notable are uploading ROM, read and write various memories of the console.
The issue with this approche, when writing application that use this techology only one application can have access to the Sd2snes. So for example you cannot run an Item tracker for alttp randomizer at the same time than the fileviewer to upload a new ROM.
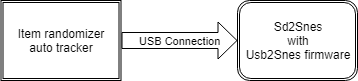
To avoid this issue, Redguyy wrote an intermediary application also called Usb2Snes (enjoy your name confusion) that other applications use to talk to the Sd2Snes.
So a basic usage look like that:

Emulators, SNES Classic…
QUsb2Snes is a replacement for the middle part of the previous diagram. Since now the application does not access directly the Sd2Snes through the Usb connection; nothing prevent this intermediate part to trick the applications to make them access something else, like a Snes Emulator or a SNES Classic
For example Snes9x

Support
QUsb2Snes currently support:
- SD2Snes with the usb2snes firmware.
- Any emulator supporting the Emulator Network Access protocol Emulator Network Access;
- SNES classic moded with Hakchi2 CE
- RetroArch support with Snes9x and bsnes-mercury cores
Application
A list of applications and what they do is available on the application page
Installation
Windows
- Download the lastest release on the release page
- Uncompress the 7zip file and start the QUsb2Snes executable
Mac os X
- Download the lastest release (dmg file) on the release page
SD2Snes devices may have issue on mac ox X
Linux
You are likely to have to compile the source yourself if you are not using one of the distribution listed bellow. See the LinuxREADME.md file to how to do it.
Debian based distrubution: Debian, Ubuntu, Mint…
Follow the instruction at (https://debian.nyo.fr) to add a repository with up to date QUsb2Snes releases.
Arch Linux
There now exists a PKGBUILD for the upstream version of QUsb2Snes which also provides QFile2Snes (https://aur.archlinux.org/packages/qusb2snes-git/)
Usage
If you don’t use a SD2Snes, you will have to activate the support for your way to play SNES in the devices menu.
SD2Snes
Latest firmware already has the usb2snes support in it. Just choose or enable the Sd2snes support in QUsb2Snes.
If you want to use an old fimrware (< 1.11) you need to install the last Usb2Snes firmware by Redguyyy by
following the instruction provided.
Don’t start usb2snes.exe since QUsb2snes do the same thing than the original software.
Your sd2snes device should show up on the Devices menu when connected.
SNES9x Rerecording & BSnes-AS
This is not supported anymore. Please refer to older QUsb2Snes releases documentation if you really need it. Emulator with Emulator Network Access support are recommanded instead. Use Snes9x-nwa, Bizhawk with the nwa tool or bsnes-plus-nwa
BizHawk 2.9 or later (bsnes core recommanded)
Download the Emulator Network Access plugin for bizhawk at https://github.com/Skarsnik/Bizhawk-nwa-tool/releases
Enable or choose the Emulator Network Access support in QUsb2Snes.
Copy the dll in the ExternalTools directory in you BizHawk folder (or create it if needed) then load the tool from the Tools->External Tools menu.
The lua bridge method is not supported anymore. Please refer to older QUsb2Snes releases for instructions if you really need it
RetroArch
You can use Snex9x (not recommanded) or bsnes-mercury cores. You need to activate the network command support, etheir in the configuration menu of RetroArch or editing your retroarch.cfg file (can be found in %appData%\RetroArch) to set network_cmd_enable = “true” (default is false). Then you need to activate the RetroArch virtual device on the devices menu. Any flavor of bsnes-mercury is prefered as we can access the ROM data.
Snex9x core : For software needing to the patch the ROM (multitroid for example) you etheir need to patch the rom manually with the IPS file or put the IPS file along side the rom with the same name for retroarch to auto patch it.
You can connect to a remote RetroArch by adding a RetroArchHosts="remoteName=ip" (note the s in Host) in the config file. If you want to add multiple hosts, just add ; between each host definition.
SNES classic (called also SNES mini)
If for some reason your SNES classic does not have the expected IP address (connected via wifi or something) you can add a SNESClassicIP=myip in the config.ini file.
Native emulator (canoe)
Mostly tested with Super Metroid.
Enable the SNES classic support on the device menu.
You need to ‘hack’ your SNES classic with the Hakchi2 CE version (https://github.com/TeamShinkansen/hakchi2/releases/) then remove the covershell mod if needed (as explained in https://github.com/TeamShinkansen/hakchi2/releases/tag/v3.4.0).
Install the serverstuff mod provided by QUsb2snes: copy the serverstuff.hmod to the user_mods directory on Hakchi2, then install the mod with Hakchi2
Start the game and check if the SNES classic appear on the Devices menu, it should display something like SNES classic : no client connected. If not, try restarting the game.
It will not work with the ‘normal’ Hakchi2 version as the Hakchi2 CE provide a more stable way to access the SNES Classic.
RetroArch
Enable the RetroArch support. Open Hakchi2 CE and in the menu go to ‘tools -> open ftp client’ it should open your default browser, copy paste the url it should look like ftp://169.254.13.37/ for the default ip, and paste in the file explorer to go to it (if it ask you for user/password, just put root as user, there is no password). Go into the /etc/libretro/ folder and copy the retroarch.cgf file somewhere. Open the copy with a text editor and search for the network_cmd_enable entry, replace false with true, save. Then now put your copy in place of the original one.