Tutorial
If you are already familiar with SNES hacking you can skip to SNESTilesKitten
General informations
Tiles, sprites and palette
First to understand SNESTilesKitten it helps to understand these 3 notions.
A tile is generally a image of a fixed size that can be used directly (Like a small patch of grass), or in combinaison with other tiles to create a bigger image (like the trees in Zelda 3).
A sprite is generally a term used for a piece of graphic associated with the main character of a game, or an enemy.
A palette is just a set of colors, generaly very small for old console.
In a SNES environement most game work with tile of 8 pixels per 8 pixels size. A sprite is composed of many of these tile. For example a character head in an RPG game is commonly the combinaison of 4 tiles. That mainly why SNESTilesKitten does not work with Sprites, since it’s just a set of tiles.
Palette in SNES programming vary from a set of 2 colors, to a set of 16 colors
SNES Image
Here a very basic explanation on how SNES images work.
Tiles are stored in a ‘clever’ way since the number of colors is limited due to very small palette size. Instead of storing the color informations for each of its pixels, only a number is stored for a pixel. This number is a position in the palette (an index). That why it was common for games to just change the palette used by a sprite to make a stronger version of an enemy, or simulate an amor upgrade (blue mail and red mail in Zelda3 are a just palette change)
The palette size used for the tile determine how the tile is stored. It leads to the term bpp. bpp mean Bitplan Per Pixel, without going into detail, the highter this value is, the more available colors you get. You have a maximum of 2**bpp (2 power bpp) colors in your palette. Typicaly graphics like a font will use 2 or 4 colors (so 1 or 2 bpp) and full sprites 16 colors (4 bpp). This is important to know since it change the way to read the tile in the ROM.
SMC header
The SMC header found on rom is a reliquat of phyisical rom copier. It’s 512 bytes of extra information about the ROM added at the beginning of the rom. It’s useless for emulator and sd card adapter for SNES (everdrice, sd2snes) so it’s a common usage in ROMHacking to remove it and consider it does not exists when talking about location in a ROM file.
SNESTilesKitten detect alone if a SMC header is present of not, so you don’t really need to bother about it.
ROM type
It exists 2 main rom type: HiROM and LoROM. You should only bother with that if you need to work with SNES address. It change the way the SNES saw ROM data.
Hexadecimal
Hexadecimal is a commonly used notation in romhacking. Instead of using 10 symbols to represent a number (0,1,2…9), it use 16 (A to F is added). It makes working with bytes and bits easier. You can use the programmer mode of Windows calculator to have access to conversion and operation on hexadecimal.
0x and $ are two prefixes commonly used to indicate hexadecimal number.
SNES location vs PC Location
SNES location in SNESTilesKitten refers to how the SNES see data in a ROM. It depends a lot on the ROM Type
PC Location are physical offset on the ROM file
SNES location is mostly for people trying to figure where are located the tile when watching assembly trace of a game. PC location should be what is commonly found in ROM MAP or information about a game.
SNESTilesKitten
Tiles preset
SNESTilesKitten use the notion of tiles preset (or preset for short). It’s a compilation of information that allow the program to locate a group of a tile in the romfile and their eventual associated palette. You can save and load them in the Gui.
You can do your own preset easily by filling the field on the Gui, using information on the game you want to work on.
Zelda 3
We will use the game The Legend of Zelda : A link to the past. I used the US rom, but for this example a PAL rom or the original japaneese rom work too. We want to change Link sprites and replace with something else.
We could directly use the preset file provided for Link sprites but the for purpose of this tutorial we will consider it does not exist.
According to documentation you can find on the Zelda3 romhacking forum Link animation sprites tiles are located at 0x80000 to 0x86FFF and the format is 4 bpp. They are not compressed
Link default palette is located at 0xDD308
Getting Link sprite
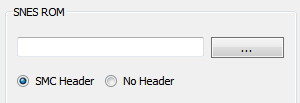
First you want to load the rom. Just click on the … button.
SNESTilesKitten will set the rom property and show some information on the status bar.

Now we need to edit the Tiles location/property
Check the PC Start radio button and fill the associated line edit with the starting value: 80000
SNESTilesKitten does not offer something to set the end, only the size/lenght. After using a calculator it’s 28672 bytes we need to put in size line edit (the end location is included, so it’s end - start + 1).
We don’t choose a compression, since default is None then we set the bpp to 4
You can already hit the refresh button since SNESTilesKitten use a default gray palette
![]()
Luckily it look better but we don’t have the colors
Let check the PC location radio button on the palette part and put DD308 then hit refresh again.
![]()
It start looking like Link, sadly color are weird. It comes from how Zelda 3 work with palette. It only store 15 colors for 16 colors palette because the first color (color 0) is assumed to be the transparency.
Check the color 0 is not included checkbox and hit refresh again. STK will replace color 0 with gray and consider the first color of the stored palette to be the second. You should have a beautiful looking Link.
![]()
At this point we should save everything we enter to a preset. It will be easier to work again on this later. Just hit the Save preset button. A dialog will appear for you to specify a Name to the preset. It will prefill the name with the rom title
Exporting Link sprite
Now that we set STK with all the proper information for Link animation sprites. We can export them so we are able to change them. Unlike many tools, STK does not work with raw snes tiles format that force you to use dedicated tools or weird BMP format but Indexed PNG.
The PNG format allow you to specify a color table (a palette) for your image and it supported by a large variety of graphic tool. So you are free to use etheir dedicated editor for pixel art or just common tool like Gimp or Photoshop.
Just hit the export to PNG button bellow the tiles scene and choose a location to save the whole tileset. You should have a png file that look like this.
![]()
Yes the resolution is small since it’s the original tileset resolution.
Edit your tile set
Feel free to use whatever you want for that. You can change the palette if you want to, just don’t change the palette size.
Inject your new Link sprites
I used a tileset that replace Link sprite by a pony for this tutorial.
Hit the replace with PNG button. You will be prompted to select a file to inject. When this step is done you have the inject dialog showing you the image you want to inject and both palette.

I recommand checking the work on a copy of the rom file to avoid erasing your currently working rom.
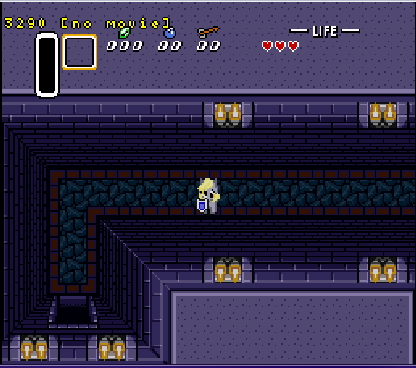
And that it, you should should have a copy of your rom with the changed sprite.
Here the patched rom on snes9x